If you're interested in creating your own DIY men's T-shirts, here are some ideas and steps to guide you through the process:
-
Plain T-Shirt:
- Start with a plain T-shirt in a color of your choice.
-
Fabric Paint or Fabric Markers:
- Choose colors that complement your T-shirt.
-
Stencil or Freehand Design:
- Decide whether you want to use a stencil for precision or go for a freehand design.
-
Painter's Tape:
- Useful for creating clean lines and preventing color bleeding.
-
Brushes or Sponges:
- If you're using fabric paint, brushes or sponges can help apply the paint.
-
Cardboard:
- Place it inside the shirt to prevent the paint from bleeding through.
-
Iron:
- To set the fabric paint according to the product instructions.
-
Choose a Design:
- Decide on the design you want for your T-shirt. It could be a simple graphic, text, or a more intricate pattern.
-
Prepare the T-Shirt:
- Lay your T-shirt on a flat surface. Insert a piece of cardboard inside to create a flat working surface and prevent the paint from bleeding through.
-
Apply Painter's Tape:
- If you have a specific design in mind that requires clean lines, use painter's tape to create the desired shapes or borders.
-
Start Painting:
- Use fabric paint or fabric markers to apply your design. If you're using multiple colors, start with the lighter colors first to avoid smudging.
-
Stencil or Freehand:
- Depending on your chosen design, you can either use a stencil for precision or go freehand for a more artistic and unique touch.
-
Allow to Dry:
- Let the paint dry completely before moving on to the next step. Follow the recommended drying time specified on the fabric paint or marker.
-
Remove Painter's Tape:
- If you used painter's tape, carefully remove it to reveal clean lines.
-
Set the Paint:
- Once the paint is dry, follow the instructions on the fabric paint or marker to set the design. This often involves ironing the T-shirt.
-
Wash Carefully:
- Wash your T-shirt according to the instructions on the fabric paint to ensure the design stays vibrant.
-
Graphic Patterns: Create geometric shapes, stripes, or polka dots.
-
Quotes or Text: Add your favorite quote or a witty phrase.
-
Nature-Inspired: Draw plants, animals, or landscapes.
-
Abstract Art: Experiment with abstract shapes and colors.
-
Personalized Silhouettes: Trace and paint a silhouette of yourself or someone else.
Remember, the key to a successful DIY T-shirt is creativity and personal expression. Have fun with the process and make a T-shirt that reflects your unique style!
Product information:
Fabric name: Polyester fiber
Main fabric composition: acetate fiber
Main fabric component 2: acetate fiber
Style: jumper
Sleeve length: Short sleeve
Technology: Printing/dyeing
Version: loose type
Collar type: round collar
Sleeve type: Regular sleeve
Popular element: print
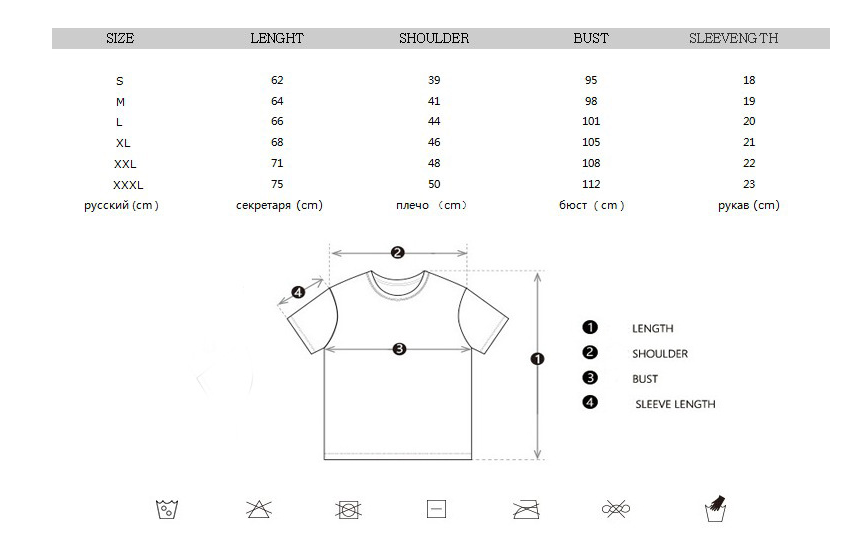
Size information:
Size: S, M, L, XL, XXL, XXXL